
In this post, I will give you an example for Image crop and upload to AWS. Here i will use cropper js. We will Upload image on Locally also. Now let’s start step wise.
Step 1. Install Laravel.
Step 2. Create Controller by Artisan command.
Step 3. Create View File.
Step 4. Setup AWS S3 in .env
Step 5. Create Route.
Step 6. Run and Test.
Step 1. Install Laravel.
composer create-project --prefer-dist laravel/laravel ImageCroper
Step 2. Create Controller
I will use artisan command for Creating a controller. If you also create directly by creating a new file.
php artisan make:controller ImageController
Check the controller file , where i write the function for Crop Image will Upload in locally as well as AWS S3.
<?php

namespace App\Http\Controllers;

use Illuminate\Http\Request;
use Storage;

class ImageController extends Controller
{
    public function index(){
        return view('image-upload');
    }

    public function upload(Request $request){
        $folderPath = public_path('storage/upload');

        $image_parts = explode(";base64,", $request->image);
        $image_type_aux = explode("image/", $image_parts[0]);
        $image_type = $image_type_aux[1];
        $image_base64 = base64_decode($image_parts[1]);

        $imageName = uniqid() . '.png';

        $imageFullPath = $folderPath.$imageName;

        file_put_contents($imageFullPath, $image_base64);


        return response()->json(['success'=>'Crop Image Uploaded.'.$imageFullPath]);
    }

    public function uploadToS3(Request $request){
        $image_parts = explode(";base64,", $request->image);
        $image_type_aux = explode("image/", $image_parts[0]);
        $image_type = $image_type_aux[1];
        $image_base64 = base64_decode($image_parts[1]);

        $imageName = uniqid() . '.png';


        $path=Storage::disk('s3')->put($imageName, $image_base64, 'public');
        $path = Storage::disk('s3')->url($path);


        return response()->json(['success'=>'Crop Image Uploaded'.$path]);
    }

}
Note. For S3 access we need to Update .env file , i will update in next coming steps.
Also required a package for S3 access , use the below command for installation.
composer require league/flysystem-aws-s3-v3
Step 3. Create View File.
Here i will create a simple blade file, which contains bootstrap and Croper js, and with a form which included input type file. The croper will show in a model box.
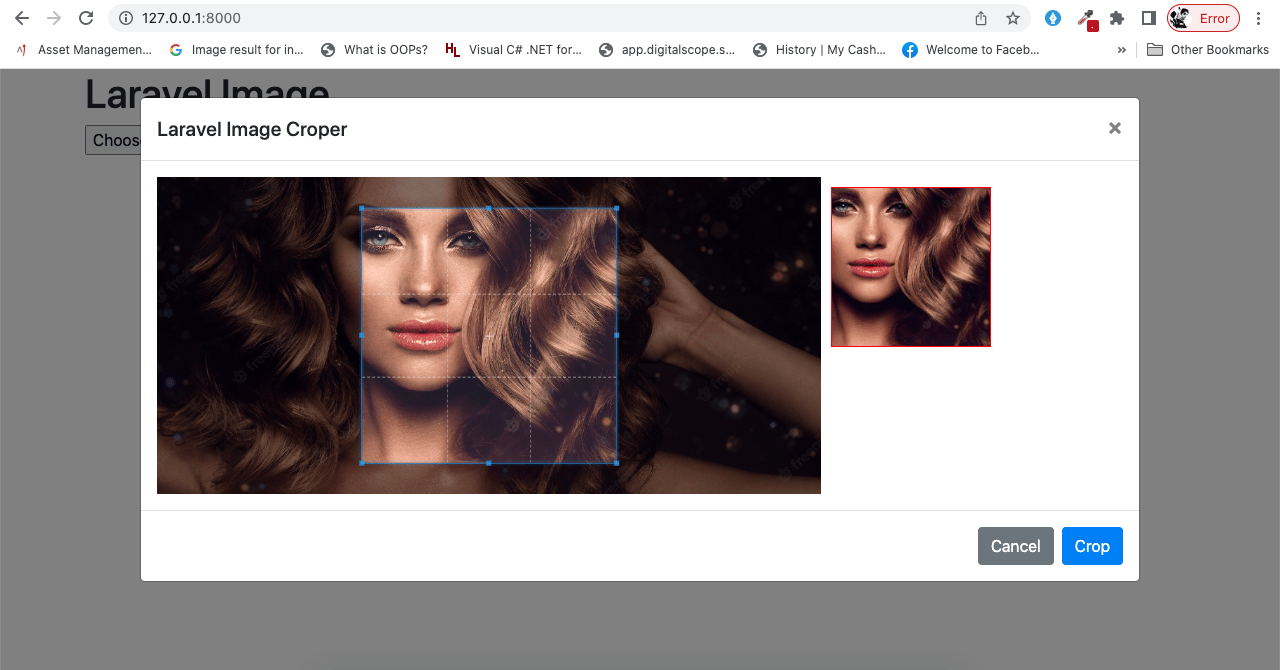
Check the code.
<!DOCTYPE html>
<html>
    <head>
        <title>Laravel Image Upload</title>
        <meta name="_token" content="{{ csrf_token() }}">
        <script src="https://cdnjs.cloudflare.com/ajax/libs/jquery/3.4.1/jquery.js"></script>
        <link rel="stylesheet" href="https://cdnjs.cloudflare.com/ajax/libs/twitter-bootstrap/4.4.1/css/bootstrap.min.css"></script>
        <script src="https://cdnjs.cloudflare.com/ajax/libs/popper.js/1.14.3/umd/popper.min.js"></script>
        <script src="https://stackpath.bootstrapcdn.com/bootstrap/4.1.3/js/bootstrap.min.js"></script>
        <link rel="stylesheet" href="https://cdnjs.cloudflare.com/ajax/libs/cropperjs/1.5.6/cropper.css"/>
        <script src="https://cdnjs.cloudflare.com/ajax/libs/cropperjs/1.5.6/cropper.js"></script>
    </head>
    <style type="text/css">
        img {
            display: block;
            max-width: 100%;
        }
        .preview {
            overflow: hidden;
            width: 160px;
            height: 160px;
            margin: 10px;
            border: 1px solid red;
        }
        .modal-lg{
            max-width: 1000px !important;
        }
    </style>
    <body>
        <div class="container">
            <h1>Laravel Image</h1>
            <input type="file" name="image" class="image">
        </div>
            <div class="modal fade" id="modal" tabindex="-1" role="dialog" aria-labelledby="modalLabel" aria-hidden="true">
                <div class="modal-dialog modal-lg" role="document">
                    <div class="modal-content">
                        <div class="modal-header">
                            <h5 class="modal-title" id="modalLabel">Laravel Image Croper</h5>
                            <button type="button" class="close" data-dismiss="modal" aria-label="Close">
                                <span aria-hidden="true">×</span>
                            </button>
                        </div>
                            <div class="modal-body">
                                <div class="img-container">
                                    <div class="row">
                                        <div class="col-md-8">
                                            <img id="image" src="https://avatars0.githubusercontent.com/u/3456749">
                                        </div>
                                        <div class="col-md-4">
                                            <div class="preview"></div>
                                        </div>
                                    </div>
                                </div>
                            </div>
                            <div class="modal-footer">
                                <button type="button" class="btn btn-secondary" data-dismiss="modal">Cancel</button>
                                <button type="button" class="btn btn-primary" id="crop">Crop</button>
                            </div>
                    </div>
                </div>
            </div>
        </div>
        </div>
        <script>
        var $modal = $('#modal');
        var image = document.getElementById('image');
        var cropper;
        $("body").on("change", ".image", function(e){
        var files = e.target.files;
        var done = function (url) {
        image.src = url;
        $modal.modal('show');
        };
        var reader;
        var file;
        var url;
        if (files && files.length > 0) {
        file = files[0];
        if (URL) {
        done(URL.createObjectURL(file));
        } else if (FileReader) {
        reader = new FileReader();
        reader.onload = function (e) {
        done(reader.result);
        };
        reader.readAsDataURL(file);
        }
        }
        });
        $modal.on('shown.bs.modal', function () {
        cropper = new Cropper(image, {
        aspectRatio: 1,
        viewMode: 3,
        preview: '.preview'
        });
        }).on('hidden.bs.modal', function () {
        cropper.destroy();
        cropper = null;
        });
        $("#crop").click(function(){
        canvas = cropper.getCroppedCanvas({
        width: 160,
        height: 160,
        });
        canvas.toBlob(function(blob) {
            url = URL.createObjectURL(blob);
            var reader = new FileReader();
            reader.readAsDataURL(blob);
            reader.onloadend = function() {
                var base64data = reader.result;
                $.ajax({
                    type: "POST",
                    dataType: "json",
                    url: "uploadToS3",
                    data: {'_token': $('meta[name="_token"]').attr('content'), 'image': base64data},
                    success: function(data){
                        console.log(data);
                        $modal.modal('hide');
                        alert("Crop image successfully uploaded");
                    }
                });
            }
        });
        })
        </script>
    </body>
</html>
Step 4. Setup AWS S3 in .env
Will set here ASW configuration. Set the below line in your .env file.
AWS_ACCESS_KEY_ID=AKIAQ7EUOYELMXXXXXXX
AWS_SECRET_ACCESS_KEY=r/hB1uPamIDockQUKe2K8qYCQHGXXXXXXXX
AWS_DEFAULT_REGION=eu-west-2
AWS_BUCKET=imageCroper
Step 5. Create Route.
I will create three route. One for view, Second for upload locally and last for upload to S3.
Route::get("/",[ImageController::class,"index"]);
Route::post("/upload",[ImageController::class,"upload"]);
Route::post("/uploadToS3",[ImageController::class,"uploadToS3"]);
Step 6. Run and Test.
Run your project by artisan command
php artisan serv
Open this is browser http://127.0.0.1:8000/
Note- On blade file you have to set on line no 114. upload or uploadToS3. Depends for where you want to upload your image.
If you are using local upload don’t forgot to like your storage, using below command
php artisan storage:link
Thanks Happy Coding.
We are Recommending you
Summernote Editor With Image Upload in Laravel
Laravel 9 send mail using SMTP
How to Export data in Excel and CSV